How to Enhance Metal Fatigue Through Testing
Why is testing for metal fatigue so important? Metal fatigue testing gives engineers an analysis of the quality of the materials used and valuable insights to design parameters. Metal fatigue tests also provide engineers with a resource to extend fatigue life of parts and components.
Posted: April 17, 2020
By:
Engineers test for metal fatigue to estimate the service life of a part by simulating the cyclic loading a part will experience when in production. It’s important to recognize the fatigue performance of a part prior to implementing it in a real-life application. Knowing the cyclic loading limits a part can withstand will help avoid catastrophic failures in the field. Having testing data to determine a component’s fatigue performance will make them safer, more reliable, and help identify room for design improvement.
Metal Fatigue Progression Stages
In this video, you’ll see the stages of fatigue failure performed at LSP Technologies using 3-point bending on MTS810 testing machine.
Stage 1: Initial Crack
Stage 2: Crack Growth and Propagation
Stage 3: Complete Failure
Another reason metal fatigue testing is important is because some cracks can be undetectable by a routine maintenance visual inspection. Having data behind the cyclic load that a component can withstand increases the validity of an inspection.
Laser Peening has been counted on as a leader in metal surface enhancement for improvement of metal fatigue performance.
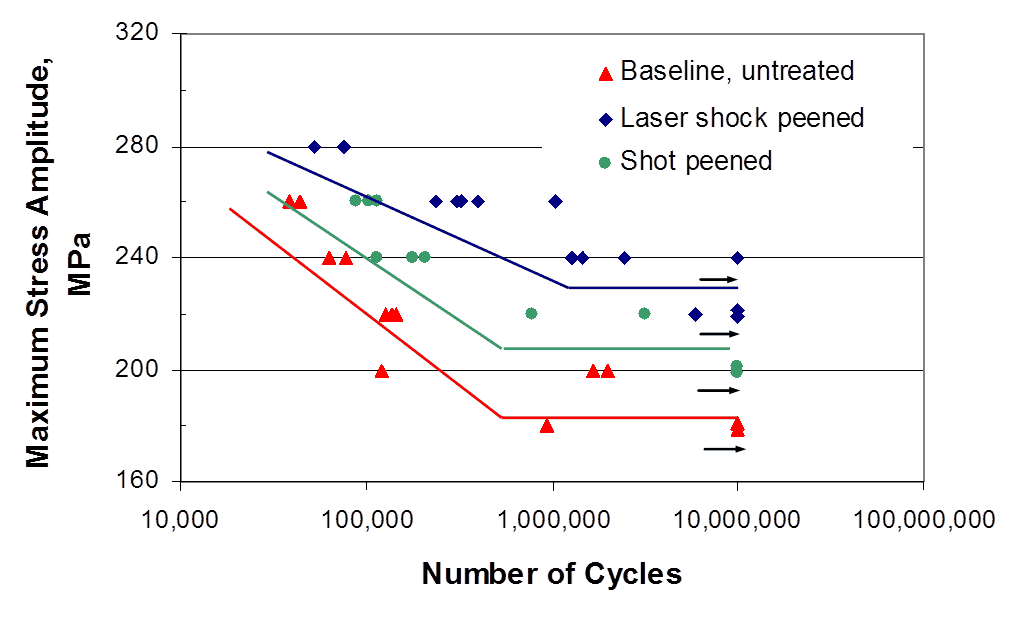
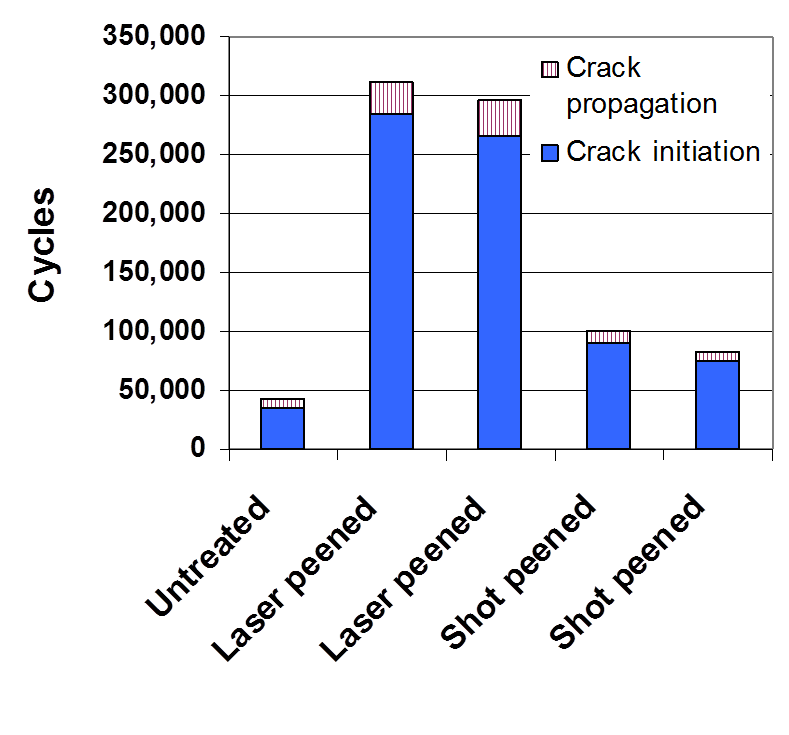
The below graphs from Peyre, et al. shows that laser peening enhancing the fatigue performance of 7050-T7351 Aluminum tested under 3-point bending by mainly delaying crack initiation and decreasing the crack propagation rates.
How does laser peening enhance the fatigue life? Laser peening induces high compressive stresses into the metal component that counteracts the externally applied tensile stresses reducing the net stress experienced by the part. The reduction of the net stress experienced by the part delays crack initiation and crack propagation thus enhancing its fatigue life. In other words, the compressive stresses protect the critical areas where the component is usually subjected to the highest amount of applied stresses that leads to the failure at that location.

This figure shows that at any given level of applied stress, laser peened part can undergo much more cycles before failure compared to both the baseline untreated part and even shot peened part.

This figure shows that at any given level of applied stress, laser peening delays both crack initiation and crack propagation of a part compared to both the baseline untreated part and even shot peened part.
Contact us to learn more about how LSP Technologies conducts fatigue life testing.
Interested in Seeing More?
Tell us about your application, material, or failure mechanism and we will have one of our experts reach out to you. Our extensive library of research and years of experience gives us a unique advantage to apply a finite element analysis to help diagnose the best application for your situation.
